I can finally call this project complete!
 It took just as long to add all the details as it did to build the entire chest. I did give it my own personal touch that I haven’t seen elsewhere yet.
 The front-fall kept getting in my way if I didn’t have it sitting on my bench. I had it leaning against the chest but kept knocking it over so I wanted to come up with a way to store it. Initially I thought of just attaching it to the back but as I was brainstorming I came up with an even better idea. Use that prime real estate for more tool holding.
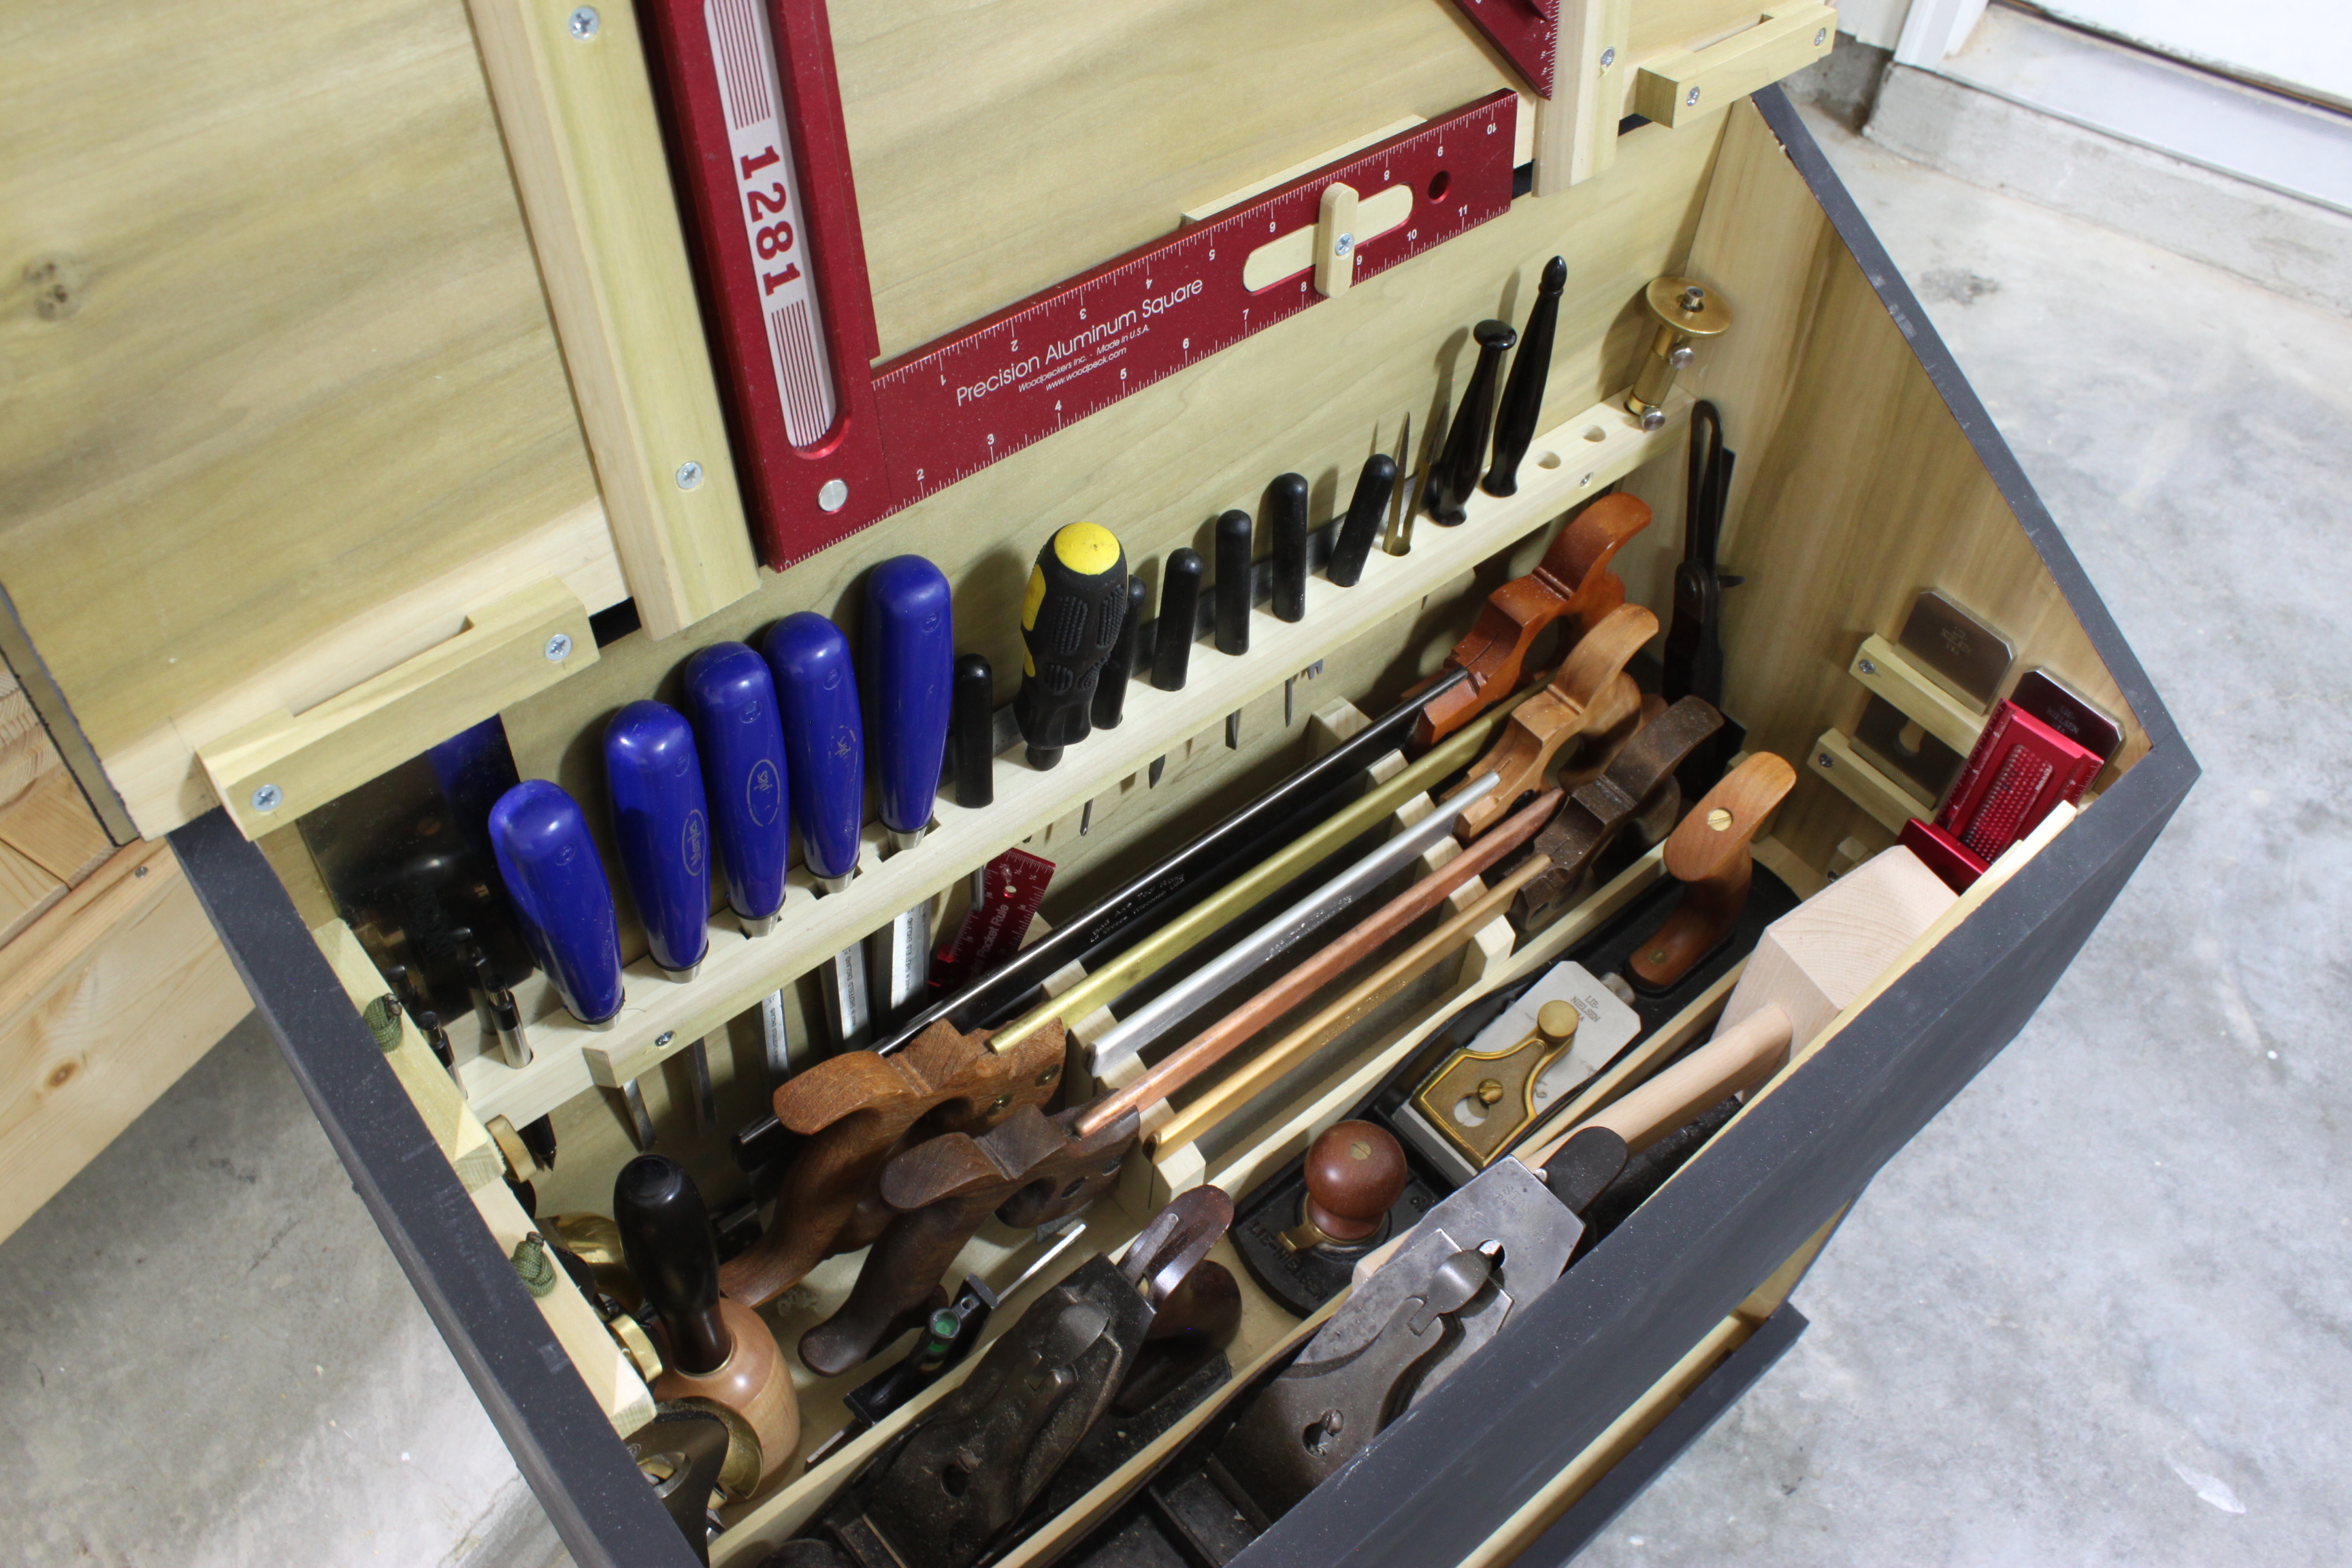
 Other than the square I consider these my lesser used tools. I didn’t want them in the bottom of a drawer somewhere so what better place to store them. I used some 550 cord threaded through the catches and hanging on a screw in the lid.
 It holds steady but I wouldn’t move the chest without taking it off or at least holding it during the move. Now for the best part; the interior.

And from the other side…
 Before you mention it, yes I know I have a saw problem. I blame Mark Harrell.
The mistake that I made in making the top compartment deeper by making the upper shelf shorter worked out perfect for me. I really used that extra 1-1/2″ in the top area to maximize storage.
Last but not least the bottom.
 Notice I had to extend the notch next to where the right batten rests. This was to make room for the square. There wasn’t enough vertical clearance even after I dropped the square below the bottom of the front-fall.
I’d have to say that this project was more rewarding to finish than my bench. All my tools now have a home and are protected. Total time was about two weeks of nights and Sunday’s and cost was in the ballpark of $200 all from Home Depot.
Most surprising is how much it holds. Here’s s a rundown:
FRONT FALL
- router plane adapter
- 3 small router plane blades
- router plane fence
- 4 drill bits
- 2 counter sinks
- 12″ square
- triangle set
TOOL RACK
- 2 mechanical pencils
- card scraper (behind pencils)
- 5 bench chisels
- 3 phillips screw drivers
- 3 slotted screw drivers
- 12″ ruler (behind screw drivers)
- dividers
- awl
- making knife
- marking gauge
TOP COMPARTMENT
- low angle block plane
- rabbet block plane
- mallet
- leatherman knife
- 12″ measuring tape
- pocket rule
- mallet
- 6″ combo square
- 16″ tenon saw
- 14″ sash saw
- 10″ carcase saw
- 12″ hybrid dovetail saw
- 10″ dovetail saw
- #4 plane
- low angle jack plane
- #7 plane
- another mallet
- bevel gauge
- protractor
- low angle toothed blade
- low angle blade (higher angle)
- 3″ t square
- 6″ t square
BOTTOM COMPARTMENT
- auger bit set
- brace
- coping saw
- hand drill
- router plane
- skewed rabbet plance
- half set even hollows and rounds
I think that about covers it. Thanks for following along.
(edit) As requested, here is a picture of the rear of the chest.


Sweet chest! I just purchased most of my materials today to get started on mine sometime this week. Sounds like we both went through a similar process in deciding on this chest. Thanks for your posts on building it.
Thanks. What are you making yours out of? I’m really happy with how everything turned out and how easy it was. Good luck with your build.
I’m using pine that was available at the Big Orange Store. There’s a few knots but I’m not too worried about them. They didn’t have nice clear poplar in sufficient size to use (envy). Hardware will be coming from Lee Valley and Amazon.
I actually wanted to use pine due to cost but the widest clear pine they had here was either 6″ or 8″ and I didn’t want to glue additional panels if I don’t have to. I wanted to get better hardware but I’m happy with what I got at the depot of homes.
Very nice! I’m still working away on mine. I’m not surprised that building out the inside took as long as building the chest itself. I was just starting to figure that out myself. To make it all work out, it looks like it took a lot clever planning. Nicely done.
Thank you. Where are you at in your build? Haven’t seen much on your site lately in regards to the chest. I do feel like I spent more time looking at the chest trying to figure out the layout than actual hands on. Looking forward to seeing your progress.
Yes, I haven’t posted about it yet. Was hoping to make more progress over labor day weekend, but was sick and had a bunch of things come up .. sigh.
The carcass is dovetailed together. I’m milling boards for the front and back. So I still have a lot to do.
I’m building the small one, so when I spaced the shelves I started thinking about lay out. I’m going to try and a hand my saw on the back inside (I don’t have as many as you). So I’m still thinking through lay. And, now I need to think about the fall front and where to put.
Your post was very helpful and thought provoking.
The chest looks awesome! I love the saw till. I personally haven’t made one yet. The dividers for the planes are a great touch as well. I have to admit I love this design, it’s very versatile; you can customize this chest almost infinitely.
Bill
Thank you! I used the cut offs from the top of the chest for the angle of the saw till. Initially I had them spaced out 1″ but that was too wide and right under the tool rest. Closed it to 3/4″, extened the back 1-1/4″, and shortened the front down to 1/2″ to make room for the tenon saw and not run in to the dividers. Perfect fit. I too love this design and plan to build another in the future.
I think I’m going to make both, the large and the small. The large one for my dad and the small one for myself. This time I will follow closely the plans in the magazine, except I will still use the cut nails rather than the screws if only because I like using them so much.
Also, I like your deeper front compartment. On mine, the two bottom compartments are spacious, but in reality I didn’t need that extra depth on both shelves. Next one I build I think I will borrow your idea and go with a slightly shallower shelf.
Again, nice work!
Bill
I wish I would have used cut nails. I like the extra character it gave yours. I want to make the smaller one as well but at the same time I’m still intrigued by the ATC and think I would actually like to make the travel chest later down the road.
The ATC is really nice, but it’s huge. I would love to have one in my garage but I just don’t have the room on the floor for it. I have a couple of 36″ wall cabinets and the new tool chest. My wife wanted me to make a blanket chest and I would possibly model it after the ATC. But if you have the space I would go for it!
That looks awesome. If you keep this up you won’t be Fameless much longer.
LOL! Thanks. I shall always be Fameless!
Gratulations! Great toolchest. I have just started my build, pictures will follow soon on my website. Can you take a picture from the back of your chest?
I like your idea of using the front panel for toolstorage.
Thank you. I added a picture of the rear of the chest which is now at the bottom of the post. Looking forward to seeing progress on your build!
Thanks for the picture. My status of the dutch toolchest can be seen here
http://www.holzundleim.de
It is a pragmatic build using plywood since my time budget is very very limited and I need the box to protect my tools before winter time…
Well done Dan, this looks great. I had to chuckle about your comment about spending more time deciding how to store tools than building the chest. Been there, done that and still doing it. My cabinet innards have changed at least 5 times in the last 3 years. Tool storage is something that can only be figured out by working through projects.
Thank you! So far I’m pretty happy with the set up. The only thing I see myself changing in the future would be the layout of the front-fall.