Out of all the joinery for the bench, I think this wedged through dovetail mortise and tenon was the most nerve racking. Considering I haven’t been doing the hand tool thing for too long, successfully assembling this joint would a big accomplishment for me. Although it may not seem like it, the layout was a bit tricky to read off the plans and to make it more complicated I had to modify them to fit my dimensions. Looking at it now it doesn’t see like it should have been but I guess it was the intimidation factor for me.
Here’s the inside..

And the outside layout.

The “x” marked areas serve as straight through mortise. Now I’m not sure how most do their through mortises by hand but I found it easier to drill my holes out about 1/2ish the way through

And then (mostly) clean it all up
 Before flipping it over and drilling out the rest.
 Once the through mortise is all complete…
 It’s time to work on the angled portion of the mortise. To do this I first established a kerf that is angled down to the marked line up to the edge on the opposite side.
 And slowly work back until the kerf line is gone.
 Next was tackling the inset portion. To make things a little easier I made a series of kerfs with my little pull saw. It’s a lot easier to pull away from the wall while sawing then push against it.
  From there is was a matter of carefully chipping out the waste until I was about 1/8″ away from my line.
 After I get the last bit out of the corner I take it all down to my scribe line and clean things up as best as possible.
 Yes, I know she’s not a looker but she gets the job done. Also considering I’m using such a soft construction grade pine, I do have to say that it did turn out well, IMO.
Next of course comes the tenon portion. For this I must admit I somewhat cheated. The total thickness for the stretchers are 2″. As you know, 2 x 6 dimensioned lumber is 1-1/2 x 5-1/2 and when I mill things up I usually get about 1-1/4″ to 1-3/8″ depending on the board. I didn’t want to put two of these pieces together and end up with 2-1/2″ to 2-3/4″ to have to thickness down to 2″. So I just bought some S4S boards from the big box store when I went back to get a couple more 2 x 6’s.
Layout for the mortise was much simpler. I’d love to show you but I was on a roll in the shop. Once I dry fit the first one and saw how great it fit I didn’t stop for pictures. Cutting out the tenons was a much simpler task. It was just three cuts. The first cut was for the 1″ shoulder, then I went down the board and cut the cheek. Lastly was the angled haunched portion. Here is the end result.

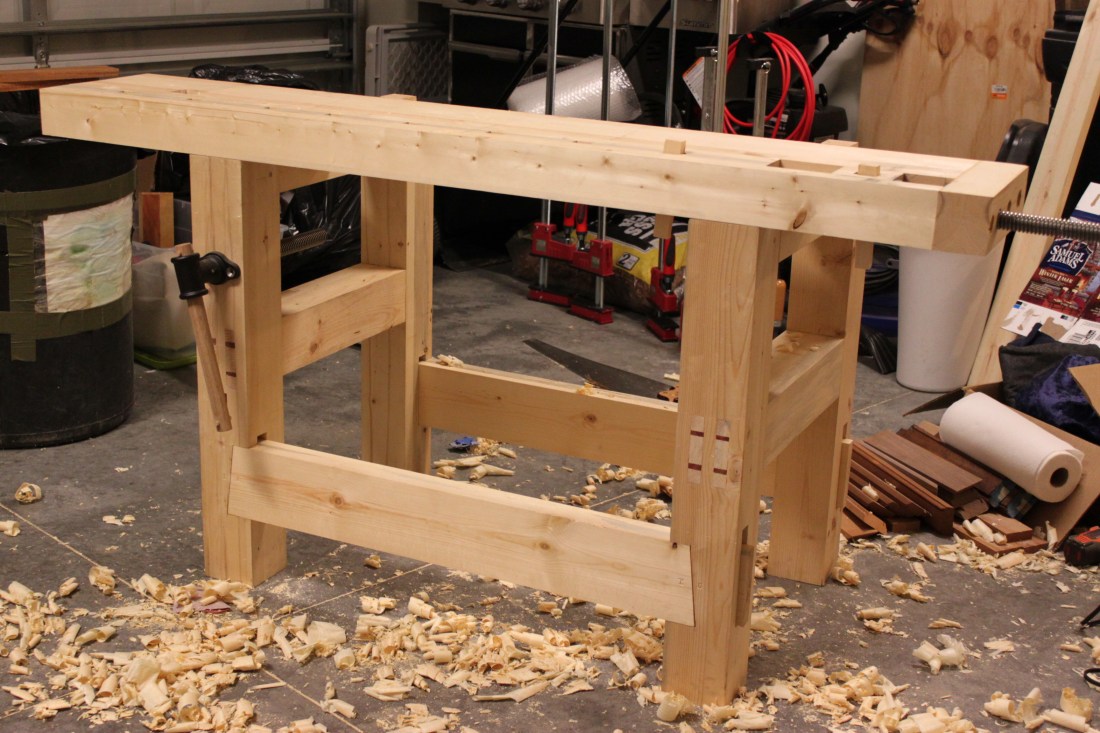
After I cleaned things up and fit each joint individually, I assembled the whole base.

As you can see I also fit the top at this point. I must say, I do love it. Although I knew the dimensions when I began building, it is a little smaller than I thought. By no means is that an issue, I still think it’s the perfect size for me and my projects. I just have to remember that the zoom function in SketchUp doesn’t mean larger in real life.
I’ve also already added the leg vise hardware and will write a post about that when that portion is all complete. I even made a couple of bench dogs and although she’s not complete, she is 100% useable. All that’s left with the base is adding the shelf, making the wedges and do a final clean up of all the joints and edges before setting her in place.


